
A version of this article was first published in June 2020.
With over 3.06 billion monthly active users, Facebook is one of the biggest platforms available to small businesses. Facebook is the perfect platform to promote content from your blog or to share images, videos and news with your followers and potential customers.
This guide will take you through the step-by-step process of setting up a Facebook page for your business. Don’t panic if you have never set up an account before, whether for business or personal use, by the end of this guide, you will feel confident enough to optimise your page and start posting.
We’ve also included plenty of visual aids and links to direct you to the appropriate pages, just to make the whole setting up process that little bit easier.
Step 1: Sign Up
Visit the 'create an account' page (click on the grid icon in the top right). Then choose the 'page' option from the 'Create' menu.
The next step is entering your business information. Enter the name of your business, brand or organisation, or a name that helps explain your Page.
Under category, type in a word or two that best describes your company and Facebook will provide you with a few suggestions. Choose the option that best describes your business and the one that customers are most likely to search for. You can add more categories later, which we will show in the following steps.
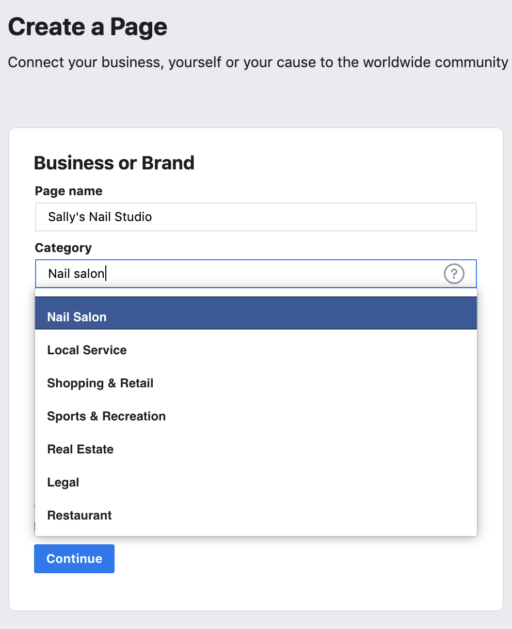
Once you have chosen your business category, you will be asked to fill out some further information, such as your address and phone number. You have the choice to keep this information private for only your region to see, or to make it public for everyone to view. Once you are happy with what you have filled out, click ‘Next’.
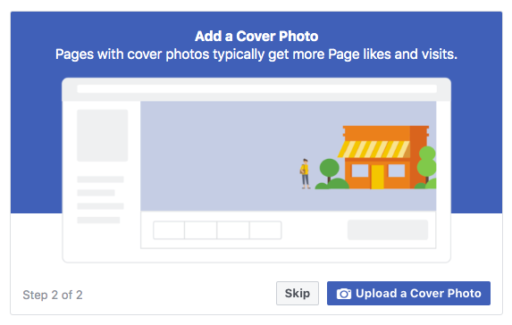
Step 2: Add Pictures
You will now need to add a profile and cover picture for your Facebook page. Your profile picture will be a visual representation of your brand, so make sure to choose a photo that aligns with your brand and is easily identifiable to your business.
Your profile picture can be your company logo or if you don’t have a logo, a popular image that is linked to your company. Your profile picture appears on the top left of your Facebook page and is cropped into a circle, so make sure to not leave any crucial details in the corners.
Your profile image will be 176x176 pixels on a desktop, 196x196 pixels on smartphones, and 36x36 pixels on most feature phones, so select an image that is cropped to a circle and is larger than this, so it does not lose quality when uploaded.
The cover picture takes up more room on your Facebook page, so is more prominent to someone who finds themselves on your page. It should be an image that captures the essence of your brand and grabs the attention of the consumer.
Facebook recommends the cover photo must be at least 400 pixels wide and in a ‘widescreen’ format (16:9) so the minimum size would be 400x225. Once you’ve picked your picture, you can move it around to best fit your page.
Once these steps are complete, you will have the option to add a WhatsApp account to your page by simply adding the number related to the account. If you decide to do this, it will allow you to add a button to your Page audience to message you on WhatsApp.
Then, you will be able to begin sharing your new page with friends, in a way to start advertising your new page to your network, with a limit of 1,000 people per day.
Finally, you can turn notifications for the page on if you wish (this is recommended), with marketing emails also available for you from Facebook, which will send over information on services that may help your page become a success.
There you have it; you have just made your Facebook business page. This is of course just the skeleton of your page, and a lot needs to be added to it before sharing it with future customers and clients. Don’t worry at this stage, your page is just a preview, so nobody else can view it until the page is made public.

Download our free guide and start improving your digital strategy today
- free social media planner
- easy to follow checklists for key areas of your digital strategy
- 10 ways to create a successful online advert
Step 3: Choose who has access to your page
The next step would be to choose who can moderate your page and this is found in the ‘Professional Dashboard’, which is on the left menu when you are looking at your page.
From here, scroll down the left menu to ‘Page Access’ and here you can add or take away permissions relating to your page. Facebook has provided details on the various roles available.
- Admin: Facebook access with full control
- Editor: Facebook access with partial control
- Moderator: Task access for message replies, community activity, ads, insights
- Advertiser: Task access for ads, insights
- Analyst: Task access for insights
- Community Manager: Community Manager access to moderate live chats
Step 4: Add Your Business Details
Your Facebook page is usually the first place your customers will come to get the information they need about your business. Start filling out your business details by clicking 'Edit Page Info' in the top menu. You can fill in all your important business information that you’d like to share with your customers.
Your Facebook page is usually the first place your customers will come to get the information they need about your business. Start filling out your business details by clicking on the ‘Page details’ option in the left menu of your ‘Professional Dashboard’. You can fill in all your important business information that you’d like to share with your customers.
From the options available, make sure you've completed the following:
- Your address
- Your service area
- A phone number
- An email address
- Website
- Any social media details
- Pricing information
Step 5: Create Your First Post
Before you start inviting people to like your Facebook Page, it is important to have some valuable and readable content on there. The first post your customers will see will set the tone and theme of your Facebook Business Page and what your company has to offer, so make sure it’s a compelling one that will make readers want to return to your page. If you're stuck for ideas, check out our blog about creating content for Facebook.
Step 6: Invite your audience!
Congratulations! You are now the proud owner of a Facebook Business Page. Now you can start inviting your existing Facebook friends to like your page. You can also use other channels such as your website or blog to promote your page and help your audience to find it.